- Preparations
- Creating the project
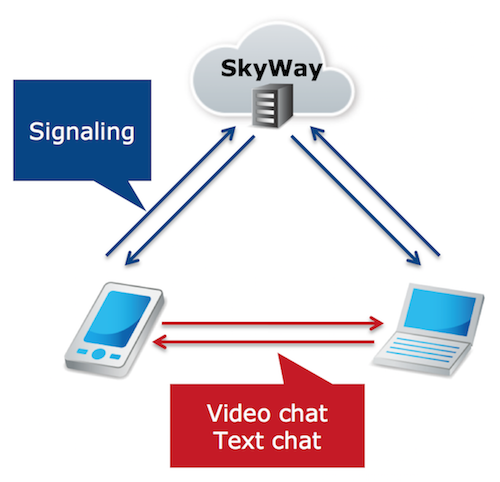
- Connect to the ECLWebRTC server
- Handling connection success, errors and disconnections
- Calling/Disconnecting/Receiving Process
- Activity Lifecycle Events
- Setup UI
- Switching Cameras
- Trying it out
Android SDK tutorial
In the tutorial, you will create a one-on-one video chat app using the basic features of the Android SDK. The app will have the ability to display a list of users currently connected to the server, select which user to call, call, answer and hang up a one-to-one video conversation.
The application to be created in this tutorial will be the same as one-to-one video chat provided in the samples. If you want to try the finished app, download the source code and follow “build” section of this tutorial.
Preparations
Obtain an ECLWebRTC API Key
For customers who have not completed a developer registration, do so from New Registration of the Community Edition. For those who had registered already, or have just completed the registration, Login to Dashboard and create an application to obtain an API key.
Application settings on the Dashboard are as follows.
| Field | Explanation of Item | What to set it to for this tutorial |
|---|---|---|
| Application Description | A short description of the application. This is only used when displaying applications on the Dashboard to help identify them. Must be less than 128 characters. |
ECLWebRTC Tutorial Application |
| Available Domains | Domain names of the servers that will be serving the app. Multiple domains can be specified. Example: foobar.com |
localhost |
| Enabled TURN | Allow users to use TURN (Traversal Using Relay around NAT) servers. The TURN server makes communication possible by relaying media and data, even when P2P communication is not possible because the communication has to go through firewalls. The TURN server closest to the user will be selected automatically. | ON |
| Enable SFU | Allow users to use SFU (Selective Forwarding Unit) server. SFU’s allow sending/receiving video and voice through a central media relay server, avoiding many disadvantages of using multiple P2P connections. Please refer to the SFU documentation for details. | ON |
| Enabled listAllPeers API | Allow users to use the listAllPeers API, which gets a list of the PeerIDs of all connected users. Refer to API Reference for details. |
ON |
| Enabled API Key authentication | Enables authentication function to prevent unauthorized use. Refer to this GitHub repository for details on how to use authentication. | OFF |
Preparing the development environment
We have verified this tutorial with the following environment.
- Android Studio 2.3.3
- Verified device
- Nexus 6
- OS Version
- Android 7.1
- Development language
- Java
- Authentication
- Make sure API Key authentication is turned OFF in the dashboard.
Creating the project
Download the Android Studio project used for this tutorial by cloning the repository below.
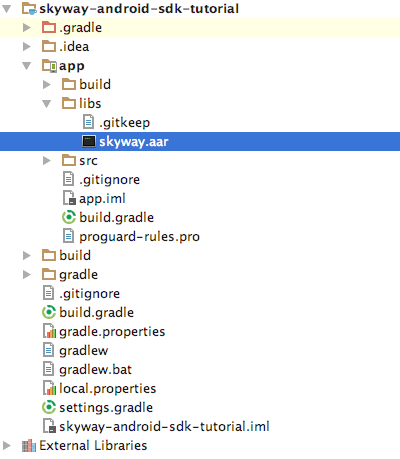
Add the SDK to the project
- Download the SDK on GitHub.
- Unzip the file and move
skyway.aardirectly into theapp/libsdirectory. - Open the development project with an IDE (e.g. Android Studio), and complete build tool (e.g. Gradle) settings.
Here is an overview of each of the files contained in the project.
- app/src/main/java/com.ntt.ecl.webrtc.sample_p2p_videochat/MainActivity
- Contains the main code for this app. You will be working with this file exclusively for this tutorial.
- app/src/main/java/com.ntt.ecl.webrtc.sample_p2p_videochat/PeerListDialogFragment
- Generates the ListDialog to display a list of PeerIDs.
- The completed version is included in the repository and will not be referenced in this tutorial.
- res/**
- For resources and layout, the completed version are included in the repository and will not be referenced in this tutorial.
Import the classes
Java
//
// Import for SkyWay
//
import io.skyway.Peer.Browser.Canvas;
import io.skyway.Peer.Browser.MediaConstraints;
import io.skyway.Peer.Browser.MediaStream;
import io.skyway.Peer.Browser.Navigator;
import io.skyway.Peer.CallOption;
import io.skyway.Peer.MediaConnection;
import io.skyway.Peer.OnCallback;
import io.skyway.Peer.Peer;
import io.skyway.Peer.PeerError;
import io.skyway.Peer.PeerOption;
Add features and permissions to manifest file
Enable the following features and permissions in the manifest file.
Java
<uses-feature android:name="android.hardware.camera" />
<uses-feature android:name="android.hardware.camera.autofocus" />
<uses-feature android:glEsVersion="0x00020000" android:required="true" />

<uses-permission android:name="android.permission.ACCESS_NETWORK_STATE" />
<uses-permission android:name="android.permission.ACCESS_WIFI_STATE" />
<uses-permission android:name="android.permission.INTERNET" />
<uses-permission android:name="android.permission.CAMERA" />
<uses-permission android:name="android.permission.RECORD_AUDIO" />
<uses-permission android:name="android.permission.MODIFY_AUDIO_SETTINGS" />
Build
Connect the device and click build. We expect some errors during here but the preparation is complete if the build passes.
Connect to the ECLWebRTC server
Defining variables
Add constants to MainActivity that are used in the program.
Set API_KEY, to the API key that was generated on the Dashboard earlier.
For DOMAIN, specify one of the Available Domains you set in the Dashboard (e.g. “localhost”).
Java
//
// Set your APIkey and Domain
//
private static final String API_KEY = "apikey";
private static final String DOMAIN = "domain";
Declare variables used in the program.
_peer: Peer Object_localStream: Own MediaStream Object_remoteStream: Opponent MediaStream Object_mediaConnection: MediaConnection Object
Java
//
// declaration
//
private Peer			_peer;
private MediaStream		_localStream;
private MediaStream		_remoteStream;
private MediaConnection	_mediaConnection;

private String			_strOwnId;
private boolean			_bConnected;

private Handler			_handler;
UI
At the beginning of onCreate method, hide the title of the main window and create a Handler for UI thread processing.
Java
//
// Windows title hidden
//
Window wnd = getWindow();
wnd.addFlags(Window.FEATURE_NO_TITLE);
setContentView(R.layout.activity_main);

//
// Set UI handler
//
_handler = new Handler(Looper.getMainLooper());
final Activity activity = this;
Create Peer Object
Create a Peer object in the onCreate method.
When creating the Peer object, specify the API key, domain name and debug level by using the PeerOption class.
Java
//
// Initialize Peer
//
PeerOption option = new PeerOption();
option.key = API_KEY;
option.domain = DOMAIN;
option.debug = Peer.DebugLevelEnum.ALL_LOGS;
_peer = new Peer(this, option);
Refer to API Reference for other options that can be specified in Peer object.
Handling connection success, errors and disconnections
Add the appropriate event callbacks to handle each event.
Open Event
Emitted when the connection to the ECLWebRTC server is ready to use. You should wait for this event before calling any other methods on the Peer object. An ID which uniquely identifies the client, known as the PeerID, can be obtained from the callback function. The PeerID can be specified or randomly generated on the server if one isn’t specified. This code displays the PeerID after the connection to the server is established.
Java
//
// Set Peer event callbacks
//

// OPEN
_peer.on(Peer.PeerEventEnum.OPEN, new OnCallback() {
  @Override
  public void onCallback(Object object) {

    // Show my ID
    _strOwnId = (String) object;
    TextView tvOwnId = (TextView) findViewById(R.id.tvOwnId);
    tvOwnId.setText(_strOwnId);

    }
});
Obtaining video/audio streams from the camera/microphone
In the callback of the OPEN event, add code to get media streams from the camera/microphone.
Requesting access to the camera/microphone 1
Check if the app has permission to access the camera and microphone and request permission if the app doesn’t.
Once you have access, call startLocalStream(), which we will define later, to get a MediaStream.
Java
// Request permissions
if (ContextCompat.checkSelfPermission(activity,
    Manifest.permission.CAMERA) != PackageManager.PERMISSION_GRANTED && ContextCompat.checkSelfPermission(activity,
    Manifest.permission.RECORD_AUDIO) != PackageManager.PERMISSION_GRANTED) {
  ActivityCompat.requestPermissions(activity,new String[]{Manifest.permission.CAMERA, Manifest.permission.RECORD_AUDIO},0);
}
else {

  // Get a local MediaStream & show it
  startLocalStream();
}
Requesting access to the camera/microphone 2
If permissions were not already granted and had to be obtained with requestPermissions(), call startLocalStream() in the onRequestPermissionResult() callback when permission is granted.
Java
//
// onRequestPermissionResult
//
@Override
public void onRequestPermissionsResult(int requestCode, String permissions[], int[] grantResults) {
    switch (requestCode) {
        case 0: {
            if (grantResults.length > 0 && grantResults[0] == PackageManager.PERMISSION_GRANTED) {
                startLocalStream();
            }
    else {
                Toast.makeText(this,"Failed to access the camera and microphone.\nclick allow when asked for permission.", Toast.LENGTH_LONG).show();
            }
            break;
        }
    }
}
Options
Options for getting video/audio can be set by MediaConstraints class. Here is a simple summary of some of the options.
maxWidth: The upper limit in pixels of the horizontal size of the videomaxHeight: The upper limit in pixels of the vertical size of the videocameraPosition: Select which device camera to use(defaults to front camera)- set to
FRONTto use the front camera - set to
BACKto use the back camera
- set to
Refer to API Reference for other options.
Java
//
// Get a local MediaStream & show it
//
void startLocalStream() {
  MediaConstraints constraints = new MediaConstraints();
  constraints.maxWidth = 960;
  constraints.maxHeight = 540;
  constraints.cameraPosition = MediaConstraints.CameraPositionEnum.FRONT;

  // continued below ...
}
Playing the MediaStream
Initialize the Navigator class, specify the constraints for the getUserMedia method and execute it to obtain your local MediaStream (local stream).
Use the addVideoRenderer method to allocate a video renderer (Canvas object) for the MediaStream object you got from getUserMedia.
Java
//
// Get a local MediaStream & show it
//
void startLocalStream() {

  // ... continued from above

  Navigator.initialize(_peer);
  _localStream = Navigator.getUserMedia(constraints);
  Canvas canvas = (Canvas) findViewById(R.id.svLocalView);
  _localStream.addVideoRenderer(canvas,0);
}
Error Event
Emitted when any error occurs. Makes it possible to determine the cause of the error and handle it appropriately (e.g. displaying the message in the log).
Java
// ERROR
_peer.on(Peer.PeerEventEnum.ERROR, new OnCallback() {
  @Override
  public void onCallback(Object object) {
    PeerError error = (PeerError) object;
    Log.d(TAG, "[On/Error]" + error);
  }
});
Close Event
Emitted when the connection with another Peer is broken. We don’t handle this event in this tutorial.
Java
// CLOSE
_peer.on(Peer.PeerEventEnum.CLOSE, new OnCallback()	{
  @Override
  public void onCallback(Object object) {
    Log.d(TAG, "[On/Close]");
  }
});
Disconnected Event
Emitted when the connection with the ECLWebRTC server is broken. We don’t handle this event in this tutorial.
Java
// DISCONNECTED
_peer.on(Peer.PeerEventEnum.DISCONNECTED, new OnCallback() {
  @Override
  public void onCallback(Object object) {
    Log.d(TAG, "[On/Disconnected]");
  }
});
Calling/Disconnecting/Receiving Process
Calling
Select the PeerID of the partner you want to call and call him/her.
Obtain the PeerID of your partner
Tap the Make Call button. If you aren’t already connected to a peer, use the showPeerIDs method to obtain a list of all other user’s PeerIDs.
Java
// Set GUI event listner for Button (make/hang up a call)
Button btnAction = (Button) findViewById(R.id.btnAction);
btnAction.setEnabled(true);
btnAction.setOnClickListener(new View.OnClickListener()	{
  @Override
  public void onClick(View v)	{
    v.setEnabled(false);

    if (!_bConnected) {

      // Select remote peer & make a call
      showPeerIDs();
    }
    else {

    }

    v.setEnabled(true);
  }
});
Connecting to the partner
In the showPeerIDs method, use the listAllPeers() method to obtain a list of all other user’s PeerIDs. Delete your own ID from the obtained list and show the list with the PeerListDialogFragment.
Java
//
// Listing all peers
//
void showPeerIDs() {
  if ((null == _peer) || (null == _strOwnId) || (0 == _strOwnId.length())) {
    Toast.makeText(this, "Your PeerID is null or invalid.", Toast.LENGTH_SHORT).show();
    return;
  }

  // Get all IDs connected to the server
  final Context fContext = this;
  _peer.listAllPeers(new OnCallback() {
    @Override
    public void onCallback(Object object) {
      if (!(object instanceof JSONArray)) {
        return;
      }

      JSONArray peers = (JSONArray) object;
      ArrayList<String> _listPeerIds = new ArrayList<>();
      String peerId;

      // Exclude my own ID
      for (int i = 0; peers.length() > i; i++) {
        try {
          peerId = peers.getString(i);
          if (!_strOwnId.equals(peerId)) {
            _listPeerIds.add(peerId);
          }
        } catch(Exception e){
          e.printStackTrace();
        }
      }

      // Show IDs using DialogFragment
      if (0 < _listPeerIds.size()) {
        FragmentManager mgr = getFragmentManager();
        PeerListDialogFragment dialog = new PeerListDialogFragment();
        dialog.setListener(
          new PeerListDialogFragment.PeerListDialogFragmentListener() {
            @Override
            public void onItemClick(final String item) {
              _handler.post(new Runnable() {
                @Override
                public void run() {
                  onPeerSelected(item);
                }
              });
            }
          });
        dialog.setItems(_listPeerIds);
        dialog.show(mgr, "peerlist");
      }
      else{
        Toast.makeText(fContext, "PeerID list (other than your ID) is empty.", Toast.LENGTH_SHORT).show();
      }
    }
  });

}
Calling
If a PeerID is selected in the PeerListDialogFragment, the onPeerSelected() method will be called. Call the call() method, passing the PeerID of the partner and your own localStream as arguments, to connect to the specified PeerID.
After calling, set up necessary event callbacks. Details of setMediaCallbacks will be explained later.
Java
//
// Create a MediaConnection
//
void onPeerSelected(String strPeerId) {
  if (null == _peer) {
    return;
  }

  if (null != _mediaConnection) {
    _mediaConnection.close();
  }

  CallOption option = new CallOption();
  _mediaConnection = _peer.call(strPeerId, _localStream, option);

  if (null != _mediaConnection) {
    setMediaCallbacks();
    _bConnected = true;
  }

  updateActionButtonTitle();
}
Disconnecting
Disconnect the connection with the partner.
Terminate MediaConnection
If the connection is alive when the actionButton (Make Call button) is tapped, use the close() method of the MediaConnection object to disconnect the specified MediaConnection and clean up using closeRemoteStream, which will be explained later.
Java
// Set GUI event listner for Button (make/hang up a call)
Button btnAction = (Button) findViewById(R.id.btnAction);
btnAction.setEnabled(true);
btnAction.setOnClickListener(new View.OnClickListener()	{
  @Override
  public void onClick(View v)	{
    v.setEnabled(false);

    if (!_bConnected) {

      // 省略

    }
    else {

      // Hang up a call
      closeRemoteStream();
      _mediaConnection.close();

    }

    v.setEnabled(true);
  }
});
Close MediaStream
When the close() method of the MediaConnection object is called, use the removeVideoRenderer() method to remove the video renderer assigned to the MediaStream.
Java
//
// Close a remote MediaStream
//
void closeRemoteStream(){
  if (null == _remoteStream) {
    return;
  }

  Canvas canvas = (Canvas) findViewById(R.id.svRemoteView);
  _remoteStream.removeVideoRenderer(canvas,0);
  _remoteStream.close();
}
Receiving calls
Answer when a partner requests a connection.
When someone is trying to establish a media connection with you, Peer.PeerEventEnum.CALL will fire. Call the answer() method on the MediaConnection object you get from the callback to accept the connection.
If you set your own _localStream, you will be able to send video and voice to your partner.
Use setMediaCallbacks to set event handlers like you did after call. Details will be explained later.
Java
// CALL (Incoming call)
_peer.on(Peer.PeerEventEnum.CALL, new OnCallback() {
  @Override
  public void onCallback(Object object) {
    if (!(object instanceof MediaConnection)) {
      return;
    }

    _mediaConnection = (MediaConnection) object;
    setMediaCallbacks();
    _mediaConnection.answer(_localStream);

    _bConnected = true;
    updateActionButtonTitle();
  }
});
Event handlers on the MediaConnection object
Here we set up the event handlers on the MediaConnection object we got above.
MediaConnection.MediaEventEnum.STREAM will fire when a MediaStream is received from your partner.
In the callback, update the connection status on the UI and use the addVideoRenderer method on the MediaStream object of the partner, to play the received stream.
Java
//
// Set callbacks for MediaConnection.MediaEvents
//
void setMediaCallbacks() {

  _mediaConnection.on(MediaConnection.MediaEventEnum.STREAM, new OnCallback() {
    @Override
    public void onCallback(Object object) {
      _remoteStream = (MediaStream) object;
      Canvas canvas = (Canvas) findViewById(R.id.svRemoteView);
      _remoteStream.addVideoRenderer(canvas,0);
    }
  });

  // continues below ...
}
MediaConnection.MediaEventEnum.CLOSE will fire if the partner disconnects.
The necessary steps to clean up will be run in the callback. Details will be explained later.
Java
//
// Set callbacks for MediaConnection.MediaEvents
//
void setMediaCallbacks() {

  // ... continued from above

  _mediaConnection.on(MediaConnection.MediaEventEnum.CLOSE, new OnCallback()	{
    @Override
    public void onCallback(Object object) {
      closeRemoteStream();
      _bConnected = false;
      updateActionButtonTitle();
    }
  });

  // continues below ...
}
MediaConnection.MediaEventEnum.ERROR will fire when any error occurs. Makes it possible to determine the cause of the error and handle it appropriately (e.g. displaying the message in the log)
Java
//
// Set callbacks for MediaConnection.MediaEvents
//
void setMediaCallbacks() {

  // ... continued from above

  _mediaConnection.on(MediaConnection.MediaEventEnum.ERROR, new OnCallback()	{
    @Override
    public void onCallback(Object object) {
      PeerError error = (PeerError) object;
      Log.d(TAG, "[On/MediaError]" + error);
    }
  });

}
Activity Lifecycle Events
Override Lifecycle methods
Override and add code to handle lifecycle changes.
In the onDestroy method, call destroyPeer() to destroy the Peer object. Details will be explained later.
Java
//
// Activity Lifecycle
//
@Override
protected void onStart() {
  super.onStart();

  // Disable Sleep and Screen Lock
  Window wnd = getWindow();
  wnd.addFlags(WindowManager.LayoutParams.FLAG_TURN_SCREEN_ON);
  wnd.addFlags(WindowManager.LayoutParams.FLAG_KEEP_SCREEN_ON);
}

@Override
protected void onResume() {
  super.onResume();

  // Set volume control stream type to WebRTC audio.
  setVolumeControlStream(AudioManager.STREAM_VOICE_CALL);
}

@Override
protected void onPause() {
  // Set default volume control stream type.
  setVolumeControlStream(AudioManager.USE_DEFAULT_STREAM_TYPE);
  super.onPause();
}

@Override
protected void onStop()	{
  // Enable Sleep and Screen Lock
  Window wnd = getWindow();
  wnd.clearFlags(WindowManager.LayoutParams.FLAG_KEEP_SCREEN_ON);
  wnd.clearFlags(WindowManager.LayoutParams.FLAG_TURN_SCREEN_ON);
  super.onStop();
}

@Override
protected void onDestroy() {
  destroyPeer();
  super.onDestroy();
}
Cleaning up when destroying the Peer
Add necessary processes at the timing when Activity is destroyed. An outline of the processes executed here is as follows.
- Close remote/local mediaStream
- Release callback events set on the MediaConnection object.(
unsetMediaCallbacks) - Reset the Navigator object
- Release callback events set on the Peer object.(
unsetPeerCallback) - Disconnect from the signaling server
- Destroy Peer objects
Details of unsetMediaCallbacks and unsetPeerCallback will be explained later.
Java
//
// Clean up objects
//
private void destroyPeer() {
  closeRemoteStream();

  if (null != _localStream) {
    Canvas canvas = (Canvas) findViewById(R.id.svLocalView);
    _localStream.removeVideoRenderer(canvas,0);
    _localStream.close();
  }

  if (null != _mediaConnection)	{
    if (_mediaConnection.isOpen()) {
      _mediaConnection.close();
    }
    unsetMediaCallbacks();
  }

  Navigator.terminate();

  if (null != _peer) {
    unsetPeerCallback(_peer);
    if (!_peer.isDisconnected()) {
      _peer.disconnect();
    }

    if (!_peer.isDestroyed()) {
      _peer.destroy();
    }

    _peer = null;
  }
}
Cleaning up the event handlers
Unset the event handlers on the MediaConnection and Peer objects.
Java
//
// Unset callbacks for PeerEvents
//
void unsetPeerCallback(Peer peer) {
  if(null == _peer){
    return;
  }

  peer.on(Peer.PeerEventEnum.OPEN, null);
  peer.on(Peer.PeerEventEnum.CONNECTION, null);
  peer.on(Peer.PeerEventEnum.CALL, null);
  peer.on(Peer.PeerEventEnum.CLOSE, null);
  peer.on(Peer.PeerEventEnum.DISCONNECTED, null);
  peer.on(Peer.PeerEventEnum.ERROR, null);
}

//
// Unset callbacks for MediaConnection.MediaEvents
//
void unsetMediaCallbacks() {
  if(null == _mediaConnection){
    return;
  }

  _mediaConnection.on(MediaConnection.MediaEventEnum.STREAM, null);
  _mediaConnection.on(MediaConnection.MediaEventEnum.CLOSE, null);
  _mediaConnection.on(MediaConnection.MediaEventEnum.ERROR, null);
}
Setup UI
Add methods related to the UI.
As actionButton is used in toggle mode, change the label depending on the connection status by implementing updateActionButtonTitle().
Java
//
// Update actionButton title
//
void updateActionButtonTitle() {
  _handler.post(new Runnable() {
    @Override
    public void run() {
      Button btnAction = (Button) findViewById(R.id.btnAction);
      if (null != btnAction) {
        if (false == _bConnected) {
          btnAction.setText("Make Call");
        } else {
          btnAction.setText("Hang up");
        }
      }
    }
  });
}
Switching Cameras
Finally, we’re going to add a way to switch between device cameras.
Use the switchCamera() method on a MediaStream, to switch between the FRONT and BACK cameras.
Java
//
// Action for switchCameraButton
//
Button switchCameraAction = (Button)findViewById(R.id.switchCameraAction);
switchCameraAction.setOnClickListener(new View.OnClickListener() {
  @Override
  public void onClick(View v)	{
    if(null != _localStream){
      Boolean result = _localStream.switchCamera();
      if(true == result)	{
        //Success
      }
      else {
        //Failed
      }
    }

  }
});
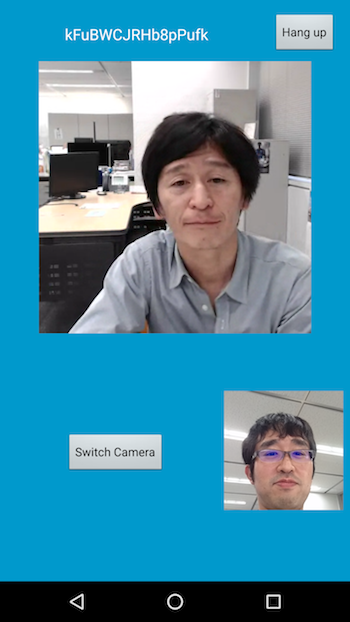
Trying it out
Build and deploy to two devices. Call a PeerID obtained using listAllPeers. It should connect and a video chat between the two devices should start. If you only have one Android device, you can try connecting to a JavaScript web-app that uses the same API key.
