- Preparation before Starting Development
- Create Project
- Obtaining video/audio streams from the camera/microphone
- Connect to the ECLWebRTC server
- Handling connection success, errors and disconnections
- Calling, Disconnecting and Receiving calls
- Setup UI
- Trying it out
JavaScript SDK Tutorial
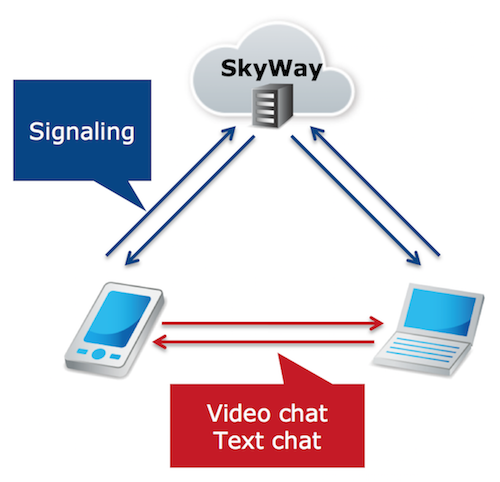
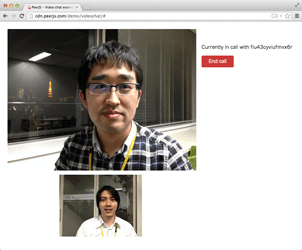
In the tutorial, you will create a one-on-one video chat web-app using the basic features of the JS SDK. The web-app will have the ability to display a list of users currently connected to the server, select which user to call, call, answer and hang up a one-to-one video conversation.
You can try it out here.
Preparation before Starting Development
Obtain an ECLWebRTC API Key
For customers who have not completed developer registration, do so from the Community Edition registration page. For those who had registered already, or have just completed the registration, login to the dashboard and create an application to obtain an API key.
Application settings on the Dashboard are as follows.
| Field | Explanation of Item | What to set it to for this tutorial |
|---|---|---|
| Application Description | A short description of the application. This is only used when displaying applications on the Dashboard to help identify them. Must be less than 128 characters. |
ECLWebRTC Tutorial Application |
| Available Domains | Domain names of the servers that will be serving the web-app. Multiple domains can be specified. Example: foobar.com |
localhost |
| Enabled TURN | Allow users to use TURN (Traversal Using Relay around NAT) servers. The TURN server makes communication possible by relaying media and data, even when P2P communication is not possible because the communication has to go through firewalls. The TURN server closest to the user will be selected automatically. | ON |
| Enable SFU | Allow users to use SFU (Selective Forwarding Unit) server. SFU’s allow sending/receiving video and voice through a central media relay server, avoiding many disadvantages of using multiple P2P connections. Please refer to the SFU documentation for details. | ON |
| Enabled listAllPeers API | Allow users to use the listAllPeers API, which gets a list of the PeerIDs of all connected users. Refer to API Reference for details. |
ON |
| Enabled API Key authentication | Enables authentication function to prevent unauthorized use. Refer to this GitHub repository for details on how to use authentication. | OFF |
Preparing a local web server
You must use a web server to serve your HTML files in order to use WebRTC.
Mac machines (OSX)
You can set up a simple web server to serve project files by running one of the commands below in the project directory that you will set up in the next step.
python 2.X
$ python -m SimpleHTTPServer 8080
python 3.X
$ python -m http.server 8080
ruby
$ ruby -run -e httpd . -p 8080
php
$ php -S localhost:8080
Windows machines
Install and set up Mongoose or XAMPP and serve your project folder which you will set up in the next step.
Create Project
For the source code used in the tutorial, please download them from the following repository.
After downloading, set up index.html so that it can be viewed on the Web server.
In the following steps, we will add required code to the script.js file, which is included in the repository.
- Some warnings before we begin
- jQuery is used in order to simplify DOM manipulation.
- This tutorial is verified on the latests versions of Google Chrome and Firefox. We may not support older versions so make sure your browser is up to date.
- Make sure API Key authentication is turned OFF in the dashboard.
Obtaining video/audio streams from the camera/microphone
We first need code to get a media stream from the camera and microphone.
This can be done with a function called getUserMedia.
Set the stream you get from getUserMedia to the srcObject property of a video element to display the obtained video stream.
JavaScript
let localStream = null;

navigator.mediaDevices.getUserMedia({video: true, audio: true})
    .then(function (stream) {
        // Success
        $('#myStream').srcObject = stream;
        localStream = stream;
    }).catch(function (error) {
        // Error
        console.error('mediaDevice.getUserMedia() error:', error);
        return;
    });
You can set the following options to the constraints (first) argument of getUserMedia.
- Capture both video and audio with default settings
{video: true, audio: true} - Capture video only, no audio
{video: true, audio: false} - Get the video with a resolution of 640x480
{ audio: true, video: { width: 640, height: 480 } } - Setting the max/min frame rate. (This works only on Chrome as of August 2017)
{ audio: true, video: { frameRate: { min: 10, max: 15 } } }
Common pitfalls 1
Depending on the browser, getUserMedia may only work with websites encrypted using SSL, due to security/privacy concerns. The compatibility status as of August 2017 is as follows.
| Scheme/Browser | Chrome | Firefox |
|---|---|---|
| http://localhost | ◯ | ◯ |
| http://domain.jp | x | ◯ |
| file://index.html | x | ◯ |
| https://domain.jp | ◯ | ◯ |
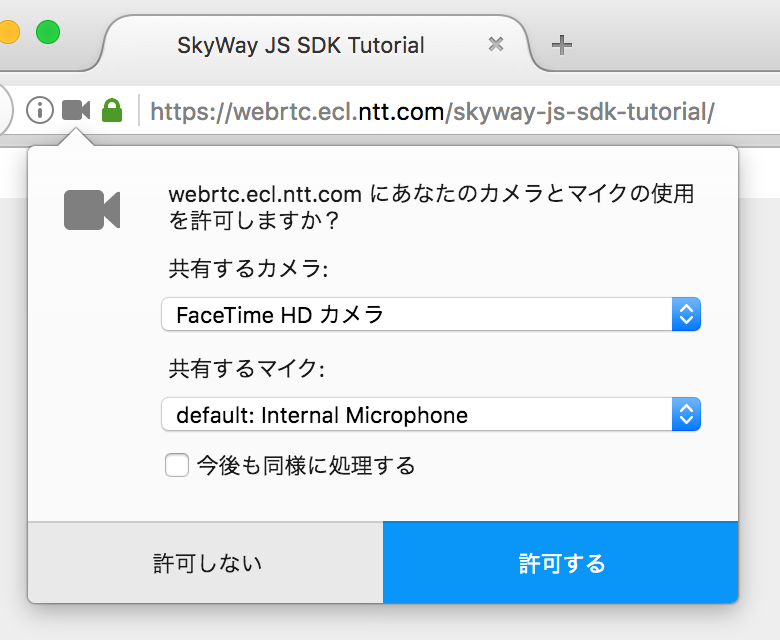
Common pitfalls 2
In order to protect the user’s privacy, they must accept a dialog box asking for permission to access the camera/microphone or else getUserMedia will fail. If multiple cameras and/or microphones are connected, you can choose the camera and/or microphone with this dialog.

Connect to the ECLWebRTC server
Import SDK
Include the SDK using a script tag.
In the tutorial source code, it is already added to index.html.
HTML
<script type="text/javascript" src="https://cdn.webrtc.ecl.ntt.com/skyway-latest.js"></script>
Create a new instance of Peer
Initialize a new Peer object.
Set the key property of the options argument to the API key that was generated on the Dashboard earlier.
For debug, specify the log output level. Log level 3 is debug mode, outputting all possible logs.
JavaScript
let localStream = null;
let peer = null;
let existingCall = null;

navigator.mediaDevices.getUserMedia({video: true, audio: true})
    // 省略
});

peer = new Peer({
    key: 'apikey',
    debug: 3
});
Refer to the API Reference for all options that can be used in the Peer object.
Handling connection success, errors and disconnections
Add the appropriate event handlers to handle each event.
Open Event
Emitted when the connection to the ECLWebRTC server is ready to use. You should wait for this event before calling any other functions on the Peer object.
An ID which uniquely identifies the client, known as the PeerID, can be obtained from the first argument of the callback function of the open event, or the id property of the Peer object. The PeerID is specified by passing a string as the first argument in new Peer(), or randomly generated on the server if one isn’t specified.
The following code, displays the PeerID after the connection to the server is established.
JavaScript
peer.on('open', function(){
    $('#my-id').text(peer.id);
});
Error Event
Emitted when any error occurs. Makes it possible to determine the cause of the error and handle it appropriately (e.g. displaying the message in an alert)
JavaScript
peer.on('error', function(err){
    alert(err.message);
});
Close Event
Emitted when the connection with another Peer is broken. We don’t handle this event in this tutorial.
JavaScript
peer.on('close', function(){
});
Disconnected Event
Emitted when the connection with the ECLWebRTC server is broken. We don’t handle this event in this tutorial.
JavaScript
peer.on('disconnected', function(){
});
Calling, Disconnecting and Receiving calls
Call
Call the partner when the Call button is clicked.
Use the peer.call() function to start the call. Specify the PeerID of the partner and your own mediaStream as arguments.
The PeerID of the partner to connect must be obtained by some other means (email, SMS, etc).
peer.call() returns a MediaConnection object which we’ll assign to the variable call.
Set the necessary event handlers on call.
Details of what we do setupCallEventHandlers will be explained later.
JavaScript
$('#make-call').submit(function(e){
    e.preventDefault();
    const call = peer.call($('#callto-id').val(), localStream);
    setupCallEventHandlers(call);
});
Disconnecting
Disconnect the connection to the partner when the Disconnect button is clicked.
Use call.close() to disconnect the MediaConnection.
Use the MediaConnection object contained in the global variable existingCall, which we will assign later in setupCallEventHandlers().
JavaScript
$('#end-call').click(function(){
    existingCall.close();
});
Receiving
Answer when a partner requests a connection.
When someone is trying to establish a media connection with you, the call event will be emitted. The callback function will contain the MediaConnection object as the first argument (which we will call call).
To accept the connection, call call.answer(), passing in your local mediaStream.
Set up the call event handlers in the same way you did when calling a partner.
JavaScript
peer.on('call', function(call){
    call.answer(localStream);
    setupCallEventHandlers(call);
});
Event handlers on the MediaConnection object
Here we set up the event handler’s on the MediaConnection object we got above (stored as call).
How you want to handle new calls when one already exists depends on the requirements of the application.
In this tutorial, if there is an existing call, we hang up that one and connect with the new one.
We assign the call to the global existingCall variable so we can track if there is an existing one and close it.
JavaScript
function setupCallEventHandlers(call){
    if (existingCall) {
        existingCall.close();
    };

    existingCall = call;

    // continues below ...
}
The stream event is emitted when a mediaStream from the partner is received.
Add obtained mediaStream object to the video.
Details of addVideo() and setupEndCallUI() will be explained later.
JavaScript
function setupCallEventHandlers(call){
    // ... continued from above

    call.on('stream', function(stream){
        addVideo(call, stream);
        setupEndCallUI();
        $('#their-id').text(call.remoteId);
    });

    // continues below ...
}
The close event is emitted when the media connection with the partner is disconnected.
The most common way for this event to occur is if one side disconnects intentionally using call.close().
This event will be emitted on both partners.
You can find the PeerID of the partner who disconnected using call.peer.
When the partner disconnects in our application, remove their video stream and set up the UI to handle a new call. Details of removeVideo() and setupMakeCallUI() will be explained later.
JavaScript
function setupCallEventHandlers(call){
    // ... continued from above

    call.on('close', function(){
        removeVideo(call.remoteId);
        setupMakeCallUI();
    });
}
Setup UI
Playing the partner’s video stream in a video element
You can play video by setting the srcObject property of the video element to a mediaStream object.
JavaScript
function addVideo(call, stream){
    $('#their-video').get(0).srcObject = stream;
}
Removing the video stream
Remove the partner’s video stream by unsetting the srcObject property of the video element.
JavaScript
function removeVideo(peerId){
    $('#their-video').get(0).srcObject = undefined;
}
Updating the UI to display/hide the call button
Implement functions to toggle the button being displayed between the Call and Disconnect buttons.
JavaScript
function setupMakeCallUI(){
    $('#make-call').show();
    $('#end-call').hide();
}

function setupEndCallUI() {
    $('#make-call').hide();
    $('#end-call').show();
}
Trying it out
Open the web page on two browser windows. The PeerID should be displayed in the “Your id” section. Copy the PeerID from one browser and paste it to the text box of the other browser and click the Call button. It should connect and a video chat between the two windows should start.
